Disclosure: This post may contain affiliate links, meaning we get a commission if you decide to make a purchase through our links, at no cost to you. Please read our disclosure for more info.
Gardeners everywhere have already embraced elevated planting spaces for their numerous benefits. These contained growing areas naturally improve drainage and crop quality while making upkeep easier.
The straightforward nature of this gardening method also helps ensure thriving vegetation and bountiful harvests.
Thankfully, constructing your own planting boxes is not as hard as it sounds. This guide will walk you through creating garden beds using cost-effective materials and simple techniques.
In This Post:
Choose the Right Location
When setting up your garden, make sure your plants get 6-8 hours of sunshine each day. Take a moment to watch how light moves across your yard before deciding where to place things. Keep those planters away from big buildings or trees that block the sun.
Wind protection also matters. Those strong gusts will suck the moisture right out of your dirt, so find a somewhat protected spot. Having a water source nearby is a total game-changer for your daily gardening routine as well.
Before you start building anything, check how well water drains in that spot. Getting familiar with the natural flow helps you dodge annoying puddles later on.
Grab one of those soil testing kits from the store. They’ll reveal important information about drainage and nutrients that’ll help you create just the right environment for your plants to thrive.
Select Your Materials
By procuring the right components, you can guarantee that your garden beds will stay practical and durable for years to come.
You should always go for robust materials. For instance, cedar and redwood naturally resist decay and insects, making them excellent options. While these premium woods cost more initially, their longevity and environmental benefits justify their price tag.
Treated timber offers a more economical alternative. However, some cultivators prefer to avoid using it when nurturing food crops due to chemical concerns.
For a modern look, steel frames work beautifully. On the other hand, natural stone creates a timeless, rural appearance that blends seamlessly with other landscape elements.
Finally, source your construction supplies from nearby vendors to minimise delivery expenses and reduce your carbon footprint.
Measure and Cut the Wood
When deciding on your bed size, aim for practicality rather than maximising space. The ideal width is about 1.2 meters, allowing you to reach the centre from either side without straining.
Plan your cuts based on the available area and the specimens you want to grow. Mark the cutting lines clearly with a pencil and ruler to minimise waste and achieve a more polished result.
Use a handsaw or circular saw for straight, accurate cuts. Also, double-check that matching pieces have identical lengths to ensure your structure will sit evenly.
Safety matters. So, pop on protective eyewear and hand coverings whenever you’re sawing wood. Tackling the project with a friend makes managing those extended pieces both simpler and less hazardous.
Keep your construction zone neat as you work. Regularly sweep aside wood fragments and other clutter. A well-organised workspace doesn’t merely look professional. It dramatically boosts your efficiency and prevents frustrating delays.
The minutes you invest in maintenance will save hours of fumbling through scattered materials and searching for misplaced tools.
Assemble the Frame
Position all components on a flat surface before beginning construction.
Screws provide better long-term stability than nails and allow for future adjustments, while metal brackets add extra reinforcement to your structure. Hence, make sure you have a collection of different-sized ones.
Moreover, pre-drilling holes prevents splitting and makes connecting the various sections easier.
Check frequently with a spirit level while building the frame to ensure everything remains perfectly horizontal. Taking your time to do this will lead to better drainage and even soil distribution.
Prepare the Site
Clear the designated area thoroughly of dead vegetation and debris. These unwanted plants will compete with your garden for nutrients if left in place.
Furthermore, level the ground carefully using a rake to create a stable foundation that prevents erosion and ensures uniform water distribution.
Before placing your raised bed, create a guide by digging a shallow 4 cm trench around your planned bed location. This will both mark the container’s position and help keep it stable once filled.
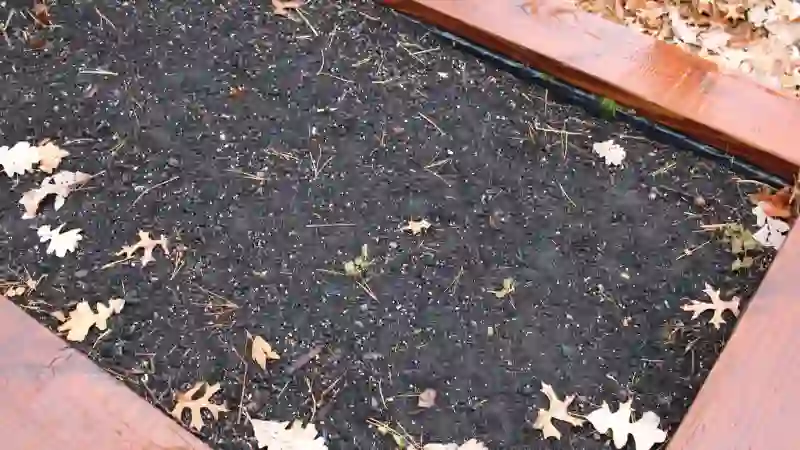
Next, cover the entire plot where your bed will sit with landscape fabric. It looks like a black tarp but allows water to drain through while blocking weeds from growing up into your container.
Make sure the fabric extends slightly beyond your bed’s edges and secure it to the ground with U-shaped garden staples. This will prevent it from moving when you add soil.
Fill with Soil
Creating the perfect growing medium will make a big difference. Blend earth, compost, and organic matter to provide plants with nutrients and proper cultivation conditions.
Don’t fill the containers completely. Reserve some space at the upper edge for adding mulch layers and soil amendments later on.
If you’re feeling uncertain about proper techniques, consider bringing in a local gardening service to handle the tricky bits for you.
Try hunting down components from nearby suppliers whenever you can. This approach trims your costs considerably while simultaneously cutting down on transport emissions.
Sometimes, the perfect growing mix ingredients sit just around the corner. You merely need to ask the right people.
Planting and Maintenance
Select vegetation suited to contained growing environments. Pairing compatible species like tomatoes and basil helps maximise space while naturally deterring pests.
Moreover, adding ground cover proves essential for moisture retention and temperature regulation. Natural substances, such as straw or bark, gradually decompose, enriching your soil. Apply a layer 5-7.5 centimetres deep to reduce irrigation needs.
Water early in the morning or evening to reduce evaporation. Alternating crops annually maintains the soil’s health and reduces diseases.
Monitor the plot for insects and use botanical remedies like neem oil to protect vegetation while preserving beneficial fauna.
Budget-Friendly Hacks
Creating gorgeous garden beds needn’t empty your wallet! Hunt around for second-hand items. Those wooden shipping pallets or leftover building materials work brilliantly.
Grab soil and compost in larger quantities to cut costs. Trust us, one big delivery beats dozens of little sacks price-wise.
Most garden centres slash prices for volume orders. Simply ring up your neighbourhood shop or your local gardening service and inquire about their bulk rates.
If you’re new to this hobby, connect with local enthusiasts. They’ll often loan you equipment rather than forcing you to invest in everything at once, and these seasoned individuals typically delight in offering guidance.
Begin modestly with just a couple of raised beds. This approach lets you discover effective methods without a major initial investment. You’ll always have the option to expand your collection once you’ve mastered growing specimens in these elevated spaces.
Conclusion
Crafting elevated growing spaces delivers genuine satisfaction while converting your yard into both a beautiful landscape and a food source. Smart preparation, premium components, and meticulous assembly create the groundwork for impressive outcomes.
Regular attention ensures your plot flourishes, yielding bountiful harvests and vibrant foliage. Begin modestly to develop some experience before expanding. Trading knowledge with enthusiasts can also help you perfect techniques and boost productivity.
Why wait? Experience the pleasure of cultivating your own crops and upgrading your outdoor environment now.